How To Install MinGW on Windows
Introduction
MinGW (Minimalist GNU For Windows) compilers provide access to the functionality of the Microsoft C runtime and some language-specific runtimes. MinGW includes:
- A port of the GNU Compiler Collection (GCC), including C, C++, ADA and Fortran compilers.
- GNU Binutils for Windows (assembler, linker, archive manager).
- A command-line installer, with optional GUI front-end, (mingw-get) for MinGW and MSYS deployment on MS-Windows.
- A GUI first-time setup tool (mingw-get-setup), to get you up and running with mingw-get.
2. Requirement
- MinGW
- Homepage : http://www.mingw.org/
- Download : http://sourceforge.net/projects/mingw/
3. Installation
- Download MinGW online installer (Ex: mingw-get-setup.exe)
- Install MinGW, MinGW by clicking on the executable.
- From the “MinGW Installation Manager Setup Tool”, click the “Install” button.
- On the next window, then change the installation directory if you want (default directory recommended). Click the “Continue” button.
- Wait for a minute for installation to complete. After the installation is completed click the “Continue” button.
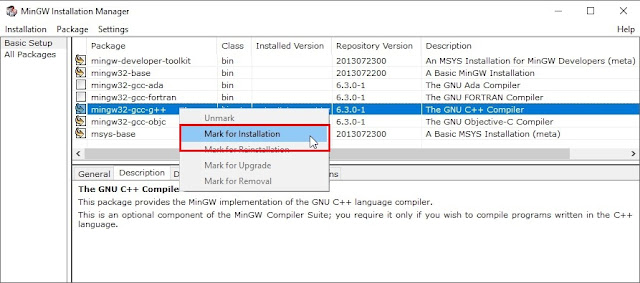
- When the full dialog box opens with a list of software
components, right-click “mingw-developer-toolkit”, “mingw32-base”, “mingw32-gcc-g++”, “mingw32-gcc-objc”, and “mysys-base” and click “Mark for Installation”.
- Click the “Installation” menu (top left corner) and then click “Apply Changes”.
- If you have seen the window “Schedule of Pending Actions”, click the “Apply” button and wait until installer prompts you with a message indicating completion.
- Now the Downloading Process will be started, you can see a little
window with progress level. Wait for a minute for the download to complete.
- After the Downloading process will be completed starting the installer. and prompt a new window “Applying Scheduled Changes” to wait until the installation will be done.
- After the installation is completed click the “Close” button.
- Now you can see our packages installation process has been
completed.
4. Configuration
After MinGW successfully installed you will need to edit the Windows PATH on your Windows system to inform the system of the location of MinGW and MSYS. Edit the Windows PATH :
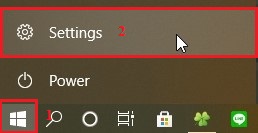
- Open the Start Menu, and then click “Settings”.
- If you have seen the window “Settings”, click on “System” and then click “About” in the left navigation bar.
- Click “Advanced system settings” under related setting in the right window.
- Click on the “Environment Variables…” button in the System Properties window, which is located at the bottom of the
window.
- Under System Variables, scroll down and select “Path”,
then click the “Edit” button.
- In the window that appears, click the “New”
button.
- Add the following line to your Windows system
PATH or the location where you installed MinGW. Type/Copy/Paste :
C:\MinGW\bin
- Then agree to the changes by clicking the “OK” button in all windows.
Note : Please use extreme care and caution when editing your Windows operating system PATH because if you delete the wrong information by accident you can cause your Windows operating system to not boot.
5. Test Your Configuration
- Open up a command line prompt and run the following command:
gcc --version
or :
g++ --version
- If you will see a message the below , then your configuration works fine.


No comments
Pembaca yang baik selalu meninggalkan komentar sesudah membaca ^_^
Terimakasih sudah mengisi komentar